Wednesday, May 27, 2015
New Website!
Please visit my NEW website www.thomasboats.com where you'll find my boats, Greenland paddles, and blog together under one cozy roof!
Tuesday, May 20, 2014
A Sampler...
Just a few images for now; first, a lovely sea kayak:
Next, a series I like to call "My Bow Points Thither":


I finally got a few more shots of my sailing canoe, which is for sale by the way. $4000 and its yours, but why put a price on beauty?


 |
| I call it "Martyak", after Martin, whom I designed and built it for. |
 |
| I love the look of this boat. |
Next, a series I like to call "My Bow Points Thither":
I finally got a few more shots of my sailing canoe, which is for sale by the way. $4000 and its yours, but why put a price on beauty?
Saturday, November 5, 2011
Boat Soup Greenland Paddle Finish
I've received quite a few inquiries asking about how I make and apply the finish for my greenland kayak paddles, so I'll detail it here. What's amazing about finishing wood is the degree to which its fodder for so much pseudo-scientific babble and art; so much so that sometimes the would-be finisher feels lost before he starts.
Well, its SIMPLE. It is. At least this method is. So don't psyche yourself out. Here's what I do.
I use "boat soup", an informal term used in the marine trades for a mixture of oil, turpentine and pine tar. The important thing to remember is this: there is no exact recipe. So you exact engineer types can just get over it.
Traditionally, boat soup was equal parts of linseed oil, pine tar, and turpentine. My version is light on the pine tar, and I substitute tung oil for the linseed oil. Additionally, I use cobalt drier to speed the drying process for me, a builder who needs to get paddles and boats out in a timely fashion.

Some words on ingredients: I try to stay away from petroleum-based stuff. I use raw tung oil, turpentine and real pine tar. Beware of petroleum-based pine tar; its inexpensive and smells bad. Bickmore's, for example, is petroleum-based. The real stuff comes from pine trees. I often use cobalt drier, available at art supply stores, to speed drying. Its nasty stuff, toxic, and even though it doesn't smell bad, its unwise to breathe it or come into contact with it. I don't use Japan drier anymore, it doesn't work on tung oil!
The first step in any quality finish is quality preparation. If you do a good job sanding, a good finish will result. That said, here's what I do.
1. Pour some raw tung oil into a clean container
2. Pour an equal amount of turpentine
3. Add some pine tar. I use a spoon to meter it. I add enough to get the color I want.
4. Stir. If the color is what I want, I leave it there. Too light? Add more pine tar. Too dark? Add more tung oil and turpentine. What I'm trying to do is get the benefit of the protection pine tar provides, while avoiding the dirty look too much pine tar will cause. I also must consider drying time. Too much pine tar will lengthen the drying time to an impractical degree.
Here is what I'm going for:

5. If you choose to use cobalt drier, add it now.
6. Apply the mix with a brush. Just slather it on, there's no need to do a nice job, just make sure the coverage is even.
7. Wait 20 minutes
8. Wipe off the the excess with a lint free rag, then let it dry overnight.
9. Second coat, same thing.
10. Third coat, apply finish, wet sand with 600 grit wet-dry sandpaper until smooth, wipe off excess with a rag. Let dry overnight
11. Fourth coat, same thing, but wet "sand" with #0000 steel wool. Let dry.
At this point, it will be looking pretty good, and depending on several factors, you might want to keep adding coats, always wet sanding with either 600 grit wet-dry paper, or with #0000 steel wool.
I live in the Pacific Northwest. During 8 months of the year the weather is so damp and cold that this finish will not dry. I use an portable oil-filled electric heater and a tarp to speed things along.
You can of course keep going with buffing and polishing compounds, but why? Remember, its just a kayak paddle!
Well, its SIMPLE. It is. At least this method is. So don't psyche yourself out. Here's what I do.
I use "boat soup", an informal term used in the marine trades for a mixture of oil, turpentine and pine tar. The important thing to remember is this: there is no exact recipe. So you exact engineer types can just get over it.
Traditionally, boat soup was equal parts of linseed oil, pine tar, and turpentine. My version is light on the pine tar, and I substitute tung oil for the linseed oil. Additionally, I use cobalt drier to speed the drying process for me, a builder who needs to get paddles and boats out in a timely fashion.

Some words on ingredients: I try to stay away from petroleum-based stuff. I use raw tung oil, turpentine and real pine tar. Beware of petroleum-based pine tar; its inexpensive and smells bad. Bickmore's, for example, is petroleum-based. The real stuff comes from pine trees. I often use cobalt drier, available at art supply stores, to speed drying. Its nasty stuff, toxic, and even though it doesn't smell bad, its unwise to breathe it or come into contact with it. I don't use Japan drier anymore, it doesn't work on tung oil!
 |
| Use them! |
The first step in any quality finish is quality preparation. If you do a good job sanding, a good finish will result. That said, here's what I do.
1. Pour some raw tung oil into a clean container
2. Pour an equal amount of turpentine
3. Add some pine tar. I use a spoon to meter it. I add enough to get the color I want.
4. Stir. If the color is what I want, I leave it there. Too light? Add more pine tar. Too dark? Add more tung oil and turpentine. What I'm trying to do is get the benefit of the protection pine tar provides, while avoiding the dirty look too much pine tar will cause. I also must consider drying time. Too much pine tar will lengthen the drying time to an impractical degree.
Here is what I'm going for:

5. If you choose to use cobalt drier, add it now.
6. Apply the mix with a brush. Just slather it on, there's no need to do a nice job, just make sure the coverage is even.
7. Wait 20 minutes
8. Wipe off the the excess with a lint free rag, then let it dry overnight.
9. Second coat, same thing.
10. Third coat, apply finish, wet sand with 600 grit wet-dry sandpaper until smooth, wipe off excess with a rag. Let dry overnight
11. Fourth coat, same thing, but wet "sand" with #0000 steel wool. Let dry.
At this point, it will be looking pretty good, and depending on several factors, you might want to keep adding coats, always wet sanding with either 600 grit wet-dry paper, or with #0000 steel wool.
I live in the Pacific Northwest. During 8 months of the year the weather is so damp and cold that this finish will not dry. I use an portable oil-filled electric heater and a tarp to speed things along.
You can of course keep going with buffing and polishing compounds, but why? Remember, its just a kayak paddle!
Friday, September 2, 2011
Summer Photo Update
"I really should update my blog.", I tell myself with mild chagrin. Again and again I tell myself, yet I've been silent since spring of this year. What have I been doing? Good question, and as I've never been a responsible document-er, I'll have a hard time remembering it all.
Boatwise, I've been building paddles and skin on frame boats. That's pretty much it. Here are a few pics of the highlights.


I almost forgot! I paddled Waldo Lake last weekend (and am going back tomorrow). In the deepest parts of the lake, the water is this insane, gorgeous brilliant deep blue:


I took Rick out for his first paddle in a kayak. He's a natural!

I made stripey paddles:

...introduced a new paddle configuration:

Building this one drove me sufficiently crazy that I raised the price for subsequent paddles from $270 to $300:

Then I lost my camera off the hood of my car, where I placed it so I wouldn't forget it. What a fool! When I finally replaced it, I was kayak fishing for salmon. Here's the setup. The 8 1/2 foot steelhead pole can reach around the ends of the boat from the cockpit. I taped on flotation so the whole rig floats even with a 6 ounce banana weight attached. You can also see the the white cutting board, and cheap fillet knife and sheath. Inside the cockpit you'll see the tackle box. This is all either thrift store or pawn shop gear:
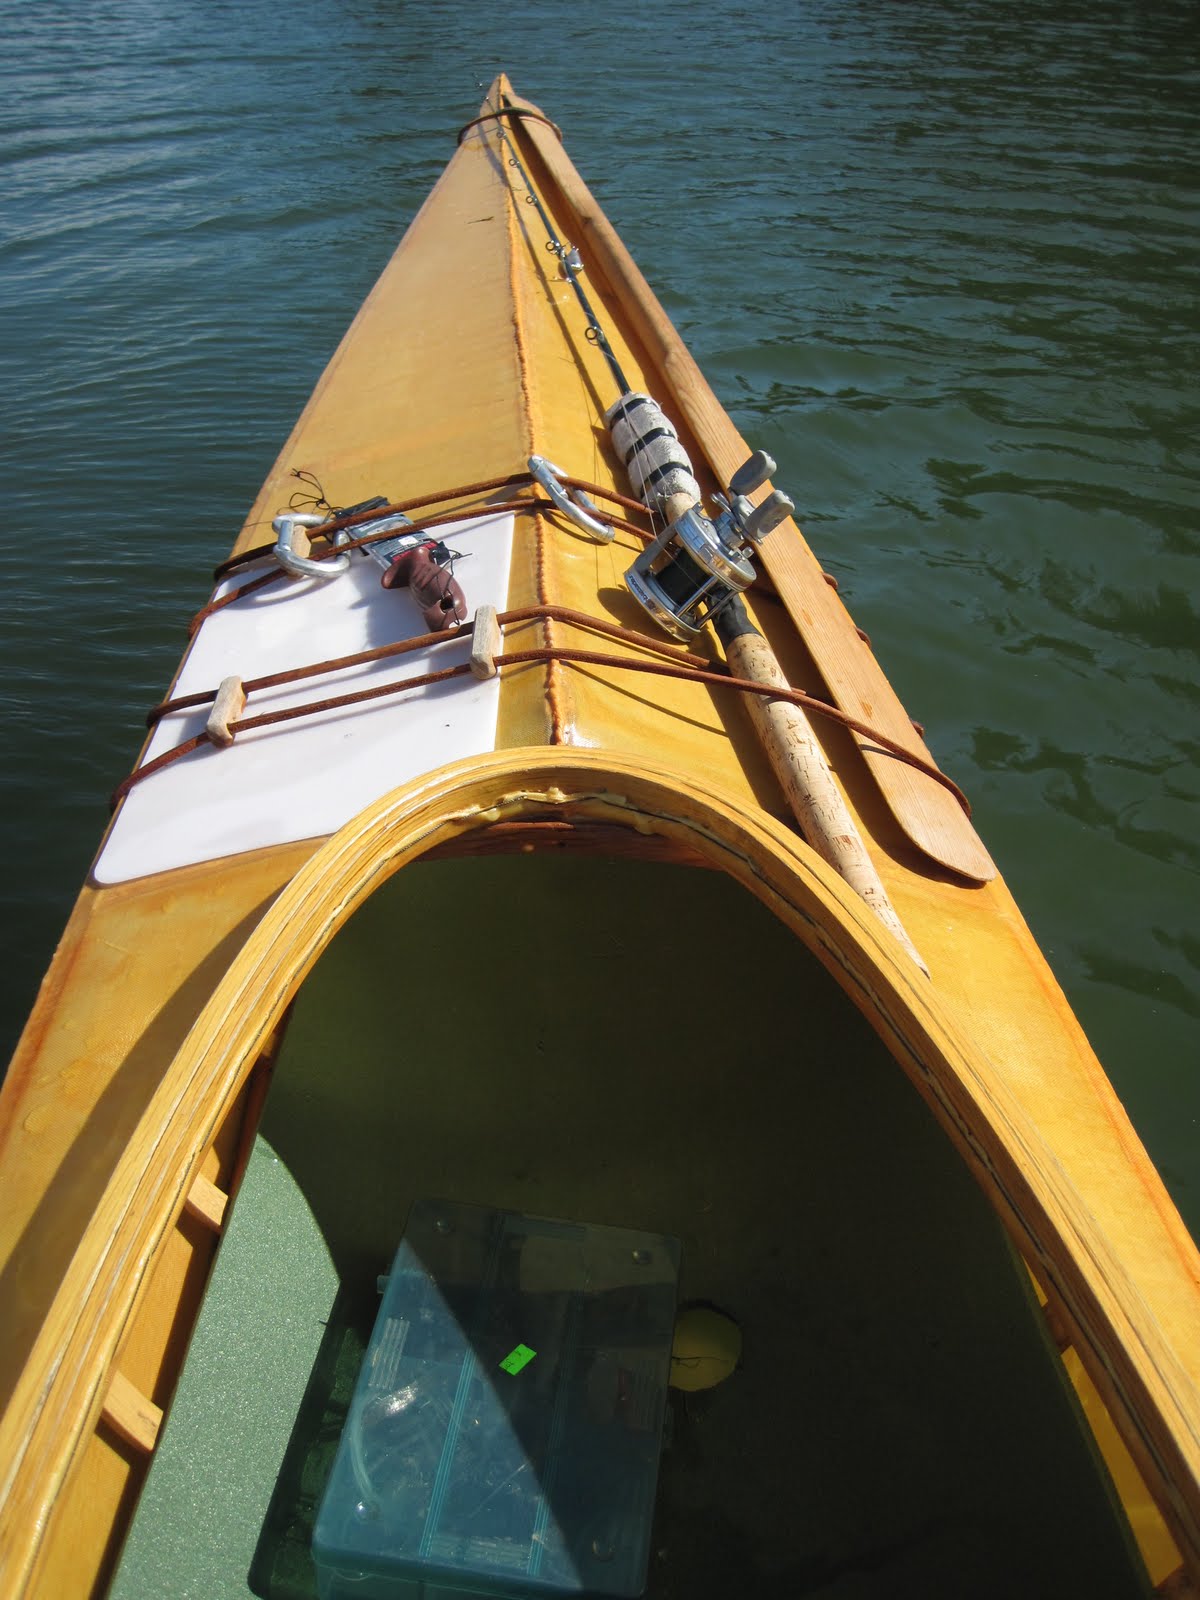
What you don't see is the black locust club on the back deck. I don't have a net. I'm not sure if that's wise or stupid. I'll let you know when I actually catch a salmon; they're down there!
Its important to leave a spot open for your paddle outrigger:

For trolling, I place the butt end of the rod in between my PFD and my body. It works well, so well in fact that I caught this monster:

This means I'm trolling too deep!:

Hopefully next time I'll post a photo of a 30 pound Chinook on the deck. I'm especially curious how I'll actually survive such a fight.
Then I launched the Summer 2011 version of Rebecca. This one cruises a bit easier, surfs better, has more secondary stability, and turns more responsively, while still balancing perfectly in wind and waves:
 |
I'm leaning towards the camera a little bit in that pic.


This next one is rather nondescript without something for scale and an explanation. That is a photo of the bottom of Waldo Lake, 50 feet down. The pattern you see is the shadow of the wave pattern on the surface! Obviously, waves were coming from two directions, making this cool pattern:

Monday, March 28, 2011
Tuesday, March 8, 2011
Paddle Making
In anticipation of spring sales, I've built a few paddles. I like to use western red cedar for the body, with black locust reinforcement. Its finished with my own version of "boat soup", a traditional mixture of oil, pine tar, turpentine, and whatever else the builder thinks appropriate. "Soup" is an apt moniker, given the propensity of cooks to throw everything but the kitchen sink into soup.

I use raw tung oil, turpentine, real pine tar from pine trees, and a dash of Japan drier. I plan on experimenting with adding a little beeswax too.

It comes out nice, but not as pretty as if the pine tar was omitted, which gives it a slightly dirty look. I think its worth it for the protection pine tar provides.
Some rationale regarding materials used in my paddles:
Western red cedar: Light weight, comes in clear, straight lengths, rot resistant, strong enough.
Black locust: Very strong, absurdly resistant to splitting, rot resistant.
Raw tung oil: Very tough finish, non toxic, natural. From the seed of the tung tree.
Pine tar: Excellent protection, smells great, made from "dry distillation" of resinous pine roots.
Real turpentine: Non petroleum derived thinner, somewhat renewable, distilled from pine resin. My friend Rick loves the smell.
Japan drier: Nasty stuff, but necessary for the finish to dry faster than a month or more.
Epoxy (and sometimes thickened polyurethane): Plastic glue, basically. Plastic, nuff said. But its waterproof.
Beeswax: Natural, waterproof, with propolis, which has antimicrobial properties.

With its constantly reversing and interlocking grain, black locust is among the most challenging woods to work, even in the small parts I use for paddles. I'm constantly fighting tearout. In contrast, there's nothing easier to work than clear, straight, western red cedar, and I'm lucky to live in the heart of its natural geographic range, where its plentiful.
Monday, January 3, 2011
Kayak Details
Deck Lines:

Deck lines are cut from thick latigo leather, which looks great, works great, and holds up in salt water as well as can be expected of leather.

These toggles are made from black locust, which, ironically, sports a beautiful yellow color. Its also very, very tough, rot resistant, and resistant to splitting due to its unique interlocking grain.
The leather gives some, and the skin gives more, allowing one to firmly hold a paddle, small water bottle, or a bilge pump, etc. Adjust the tension by sliding the toggles.
But the greatest thing about these deck lines is their ability, partnered with a Greenland paddle, to create an outrigger. The boat is incredibly stable in this position! They also offer a rock solid handhold, unlike bungee cord:


Seat:

My claim to fame. Building a kayak this way has been done by countless others before before me, but the only parts I can call truly mine are the hull shape, and this seat. I sew up a scrap of leftover nylon skin, then thread dowels behind the ribs and through the loops. Adjust the tension of the seat by using smaller or larger dowels, or just add another dowel.
Also notice the spacing of the ribs for comfort. This seat is very, very comfortable!
Foot braces and foot box:

These are Harmony Slidelock foot braces. Simple, strong and easily adjusted. Notice the adjustment of frame spacing for foot comfort.
A closed cell camping pad, cut to the contours of the boat, slides in over the seat and ribs. It provides comfort, insulation from 50 degree water, and helps keep the kayak clean. (pic to come)
Lashing:
 |
| Lashing keel to rib. It is leatherworkers' artificial sinew. |
Rub strip:

Once again, black locust, and easily replaceable. This takes the brunt of the abuse when dragging the boat up the beach.

Carry Straps:
 |
| Thick leather is sewed together, then wrapped with #18 tarred seine twine. |
Subscribe to:
Posts (Atom)