
I returned from the lumberyard at about 1:00. I set up the thickness planer. These will be the longitudinal pieces: gunwales, keel, chines, secondary chines and center deck beam. I'll also get the stems out of that 1x6. The wood is Western Red Cedar:

Ripping on the tablesaw:

I eased over the edges with this 1/8" round over bit:

Then I cut out pieces to laminate a curved deck beam.
I have plenty of rib stock I milled up a couple months ago. I also have most of the curved and straight deck beams ready to go:

Although I have enough pre-built curved deck beams, I'm making a new one with slightly more arc so I'll have more room for my knees than the previous version. I might have to make another one too, but I'll cross that bridge when I come to it:
 |
| Four laminations, Gorilla Glue, and spring clamps over a simple form. |
I even have the coaming pre-made. Its a little small for me, but it will do. I have it on hand, so I'll use it:

I quit at 5:00. Tomorrow I'll lay out and cut the mortises in the gunwales, then figure out the deck.
Day Two:
Wow, its the end of the day already?
The kayak I'm building is a "tweak" of my Rebecca design. I began today by figuring out exactly what I wanted to do differently. After much deliberation, second guessing, third guessing and a leap of faith, I chose to move the cockpit aft two inches. "Is that all? For all that agony?" I'm afraid so. The current version of Rebecca is so good that I'm very careful when I make changes. I don't want to labor for a week, use up the last of my materials, and blog the build if the result isn't at least as good as what came before.
The problem with moving the cockpit aft, is it basically changes everything. Many the measurements I recorded from the previous boat will not work. Its almost like a new design to the builder, if not in performance.
I also made some superficial changes improve the fit for a paddler my size. Also, later, when I'm bending in the ribs, I'll try to refine the lines aft.
Routing the gunwales to receive the ribs. There are lots of ways to do this, but this is the fastest. Kudos to my buddy Brian for showing me this one:

There are about a hundred ways to screw up the mortises for the deck beams, so I take the time to sit quietly, get my bearings, and clearly mark everything so I do it right:


Day Three:
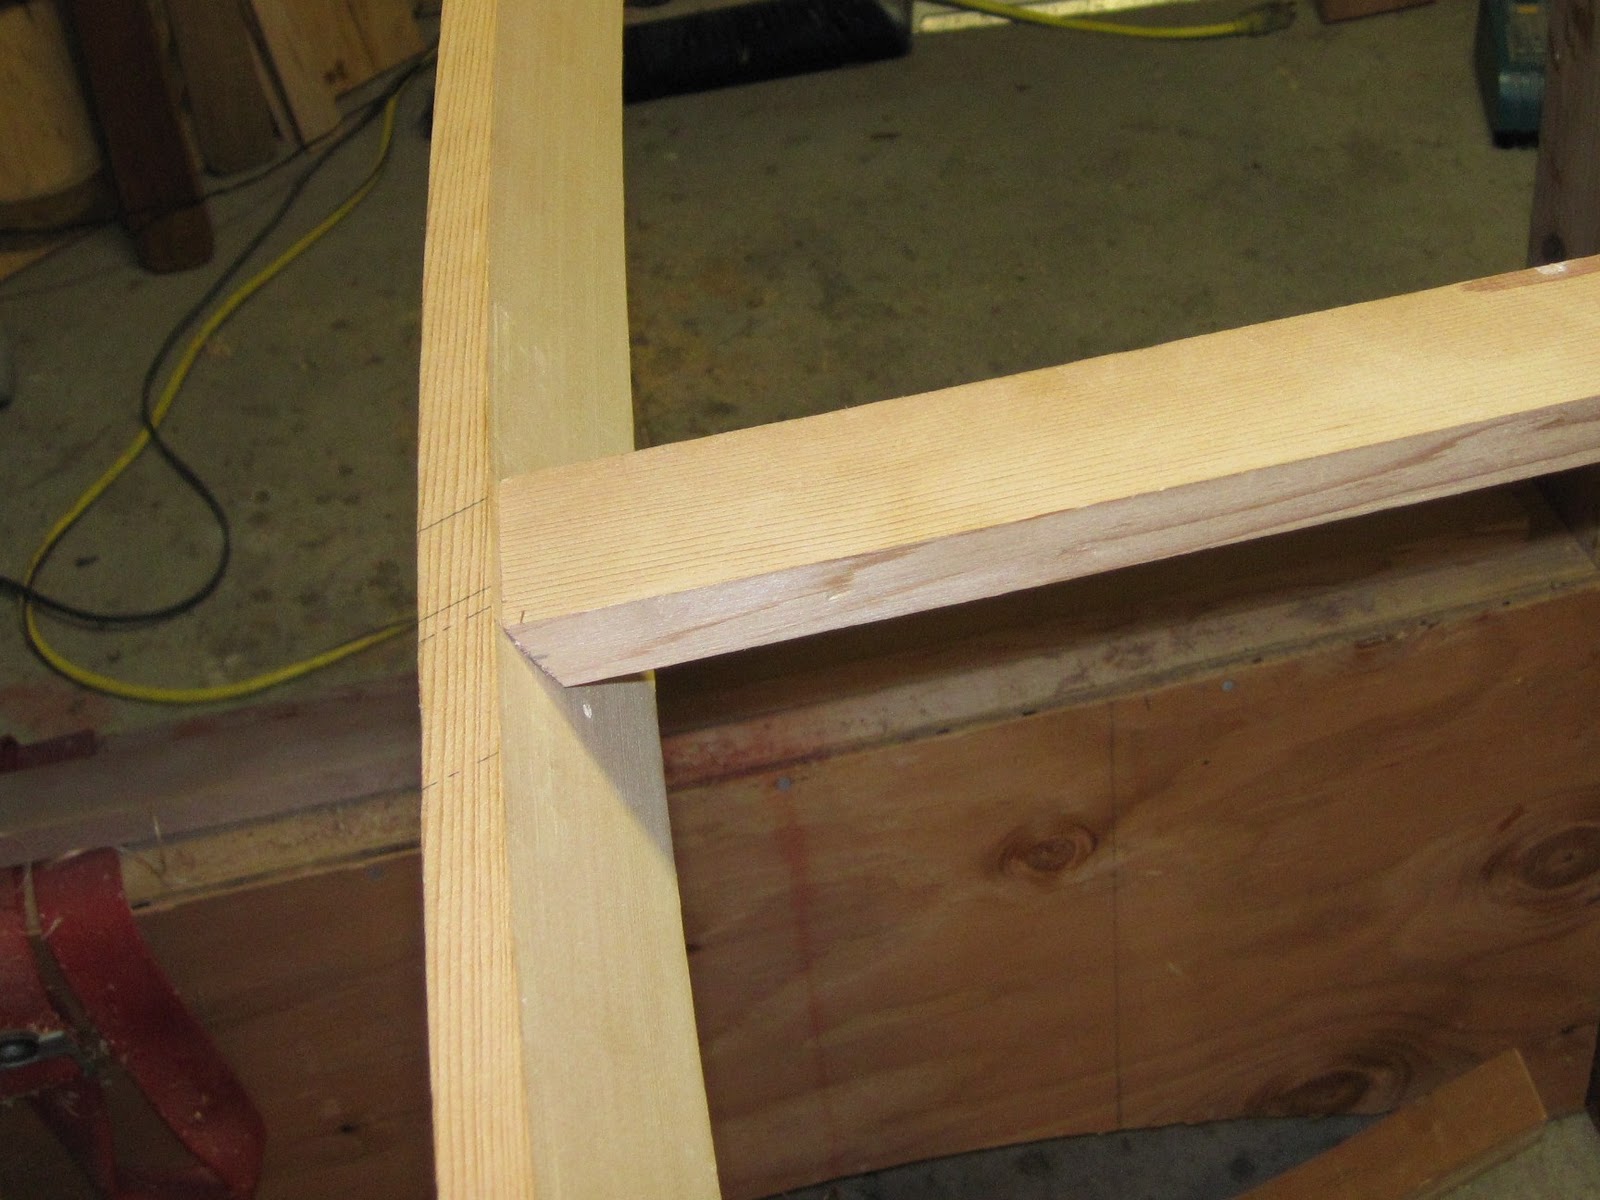
After making sure the gunwales were shaped like I wanted, I began installing the deck beams. I use a mortise and tenon joint like this:

I cut the tenon using a handsaw, chisel and rasp. It goes fairly quickly. There are all kinds of compound angles here, so I really don't know how it could be done efficiently with power tools. Every deck beam is has different angles. The trick to doing it right is to throw away the tape measure and mark everything in place by scribing.

Here's a typical fit. It doesn't have to be perfect, which is a boon to getting things done quickly:

Its much more important that that shoulder of the tenon bears on the gunwale evenly:

I cut this one 1/8" short! Surprisingly, my eye caught this mistake before the tape measure confirmed it by measuring the beam at that point. I pulled the tenon out a bit and slipped this spacer in:

All better:

I honestly don't know if 1/8" really makes a difference in performance, but if I can see it, I might as well fix it.

I placed the cockpit coaming on, just so I could look at it for a couple of minutes. I'm starting to imagine I could paddle it.

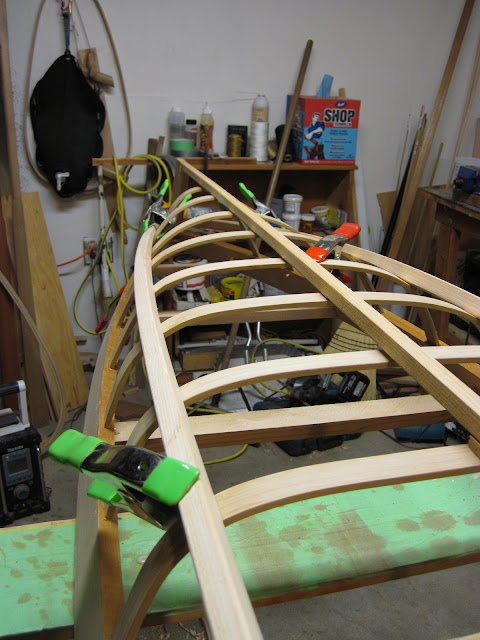
I planned on getting all the ribs installed today, but they had other plans. As soon as I pulled them out of the steam box, they immediately began giving me fits. I broke four out of the first five, and six out of the first ten. At this rate I'm going to run out of ribs too quickly, so I decided to soak them in water overnight and try again tomorrow. I hope it works, because I can't get extra bamboo locally.
Day Four:
Soaking the ribs overnight worked well, and I was able to install all the ribs. However I still broke several attempting to bend them to the tight radius needed for the first two:

Rib kindling, the finest:

But I eventually succeeded:


Look closely at the third and fourth ribs from the stern. That's not a fair line is it? Ponder this: is the fourth rib too recessed, or is the third rib too proud? What about the fifth rib? I replaced the fourth rib once, trying to give it softer "shoulders". I will work on this, but will likely wait until I get the chines on. They'll help tell me what to do. You likely can't solve this problem because you are missing a critical bit of info, which is the picture I hold in my head of what I want this section to look like when its skinned and finished. Like life, if you know where you are going, you can make the right choices.
Ok that's enough pep talk. 'Till tomorrow...
Day five and six:
I'll combine these two days because not much exciting happened. The work has become tedious and not very "bloggable". First, I made patterns for the stems and fussed over them endlessly. I want it to look "just so", but since I don't know exactly how to get what I want, the best I can do is draw the curve over and over, followed by a spell in the moaning chair, then do it again. I'm quite pleased with the aft stem:

And I'm OK with the forward stem for now. Sometimes one needs to give up and move on. I'll do better on the next one:

I fixed the lines aft:
Things were looking good, and I thought I was home free...until...(cue old radio drama music):

This probably looks OK to you, but I know that its not what I was going for. Remember I'm building a slightly tweaked version of the Rebecca design. My eye was telling me the chines were too far apart. So, I checked my measurements. Again and again I checked them, but they all agreed with the measurements I lifted from the great performing Rebecca. I was stumped. To make a boring and convoluted intellectual journey short, in the end I realized that I had failed to take something specific into account when measuring the original Rebecca.
Its one thing to build a kayak this way by eye, but what's important is being able to copy it! Musicians talk about this, about aural memory, and of course music is written down, like any written language, so ideas can be accurately reproduced without relying on memory. My own language, invented by me to convey the idea of this kayak, was flawed. I realize there is a well established method of doing this used by those in the field of naval architecture, but I also realize I can build a skin on frame kayak in a week, and test it, before their design even leaves the drawing table or computer. During the long process of building and testing close to 20 kayaks, I felt there was no faster way to achieve my goal of a great kayak. I was right. But now I'm no longer prototyping. I just want to reproduce this design, and now I see the great value of a table of offsets, lofting, moldmaking, etc. Unfortunately, that's just too much work. Its worth it if the boat takes a long time to build, or if I sell the design at some point, but not for me, the designer, building one at a time. So I dreamed up a system of ratios to describe my kayak more accurately. I felt like a mad scientist:
I began, then abandoned, several ideas, including a crazy attempt to describe the rate of change of certain hull parameters with a math equation; basically a "unified theory" equation for this boat. HA! It made my head spin. All I was trying to do was find the correct rib lengths, so, using hard data lifted from Rebecca, I made tables and tables of numbers. Then I graphed the depth to beam ratio to the rib to beam difference. (Yeah, I'll read this tomorrow and wonder who wrote it and what he's talking about.)
The end result was a simple graph to guide me when building kayaks of similar shapes, and a table that flat out tells me what the rib lengths should be for Rebecca.
Its not exciting boatbuilding, I know. Sorry about that. If all I was doing was building, I'd be done by now. But, once again, if you know where you are going, then you can make the right choices. These last two days were about discovering where, exactly, I was going.

Today I replaced several ribs, then finished the frame:


A month later....
On day eight I skinned and dyed it, day nine (2 hours) I gooped the bottom, day ten (2 hours) I gooped the top, and finally finished it on the morning of day eleven, installing the backband, seat, and deck lines.

The "goop" is a proprietary 2 part polyurethane developed especially for skin on frame boats by Spirit Line. Being 100% solids, it contains no solvents, thus no odor. It is applied with a plastic squeegee. It can messy and finicky, but its awesome stuff.
Ready to go:

On the water:

Deck line detail. Straps are thick latigo leather. Toggles are oiled black locust. Ironically, black locust has the nicest yellow color:


Home
Wow, its the end of the day already?
The kayak I'm building is a "tweak" of my Rebecca design. I began today by figuring out exactly what I wanted to do differently. After much deliberation, second guessing, third guessing and a leap of faith, I chose to move the cockpit aft two inches. "Is that all? For all that agony?" I'm afraid so. The current version of Rebecca is so good that I'm very careful when I make changes. I don't want to labor for a week, use up the last of my materials, and blog the build if the result isn't at least as good as what came before.
The problem with moving the cockpit aft, is it basically changes everything. Many the measurements I recorded from the previous boat will not work. Its almost like a new design to the builder, if not in performance.
I also made some superficial changes improve the fit for a paddler my size. Also, later, when I'm bending in the ribs, I'll try to refine the lines aft.
Routing the gunwales to receive the ribs. There are lots of ways to do this, but this is the fastest. Kudos to my buddy Brian for showing me this one:

There are about a hundred ways to screw up the mortises for the deck beams, so I take the time to sit quietly, get my bearings, and clearly mark everything so I do it right:


On each gunwale, there are five mortises that are drilled straight through, and three mortises that are drilled at twenty-five degrees. Since the gunwales are mirror images of each other, it can be easy to drill the angle the wrong way.
Here's my simple angle gauge. I drill, then slide the gunwale along to the next mark. If that mark says "straight", I pull out the blocks for that one.

If I would just spend an hour building a jig for my router, I wouldn't have to use the drill press, and the mortises would be ready to go, no clean up with a rasp or chisel. But this isn't that bad; its quiet, and I get to sit on a chair. I'm not used to sitting on the job, and I kind of like it!
 |
| Hey, I don't want to her from you guys having a hissy fit because my mortise isn't perfect. It doesn't need to be, you'll see. |
Here's something I should have done yesterday. Its not the first time I've forgotten, and probably won't be the last. Its an extension glued onto the forward part of the gunwale so I can make it swoopy and cool. Doing this now instead of yesterday messed up my schedule a little bit. Not only did I have to wait at least an hour for the glue to dry, I had to do it twice because I didn't have enough clamps. One extension for each gunwale: two hours lost.

...But I filled part of my time making my goofy highly personalized spec sheet. At the end of this build, this piece of paper, and about three others, will all be filled with highly classified information:

And I cut the ribs to rough length. I think it actually shows the displacement curve fairly accurately:
 |
| I left them a bit long. Later, I'll trim them by eye. |
I copied these rib lengths from the previous version of this kayak. It should get me in the ballpark.
The mortise doesn't need to have square edges here. In fact, its probably better that it doesn't, since water will drain out:


Hey, its a boat:

Day Three:
After making sure the gunwales were shaped like I wanted, I began installing the deck beams. I use a mortise and tenon joint like this:

I cut the tenon using a handsaw, chisel and rasp. It goes fairly quickly. There are all kinds of compound angles here, so I really don't know how it could be done efficiently with power tools. Every deck beam is has different angles. The trick to doing it right is to throw away the tape measure and mark everything in place by scribing.

Here's a typical fit. It doesn't have to be perfect, which is a boon to getting things done quickly:

Its much more important that that shoulder of the tenon bears on the gunwale evenly:
I cut this one 1/8" short! Surprisingly, my eye caught this mistake before the tape measure confirmed it by measuring the beam at that point. I pulled the tenon out a bit and slipped this spacer in:

All better:

I honestly don't know if 1/8" really makes a difference in performance, but if I can see it, I might as well fix it.
All the deck beams are in:

I placed the cockpit coaming on, just so I could look at it for a couple of minutes. I'm starting to imagine I could paddle it.

I planned on getting all the ribs installed today, but they had other plans. As soon as I pulled them out of the steam box, they immediately began giving me fits. I broke four out of the first five, and six out of the first ten. At this rate I'm going to run out of ribs too quickly, so I decided to soak them in water overnight and try again tomorrow. I hope it works, because I can't get extra bamboo locally.
 |
| I use bamboo for all the ribs except for the first three, which are usually white oak. |
Day Four:
Soaking the ribs overnight worked well, and I was able to install all the ribs. However I still broke several attempting to bend them to the tight radius needed for the first two:

Rib kindling, the finest:

But I eventually succeeded:

The ribs are pulled out of the steam box, bent by eye, then placed in the mortises I routed previously. Often I'll replace a couple I don't like, then use a hand saw to trim a few of the ribs so I get a fair line.
Apart from installing the ribs, I spent a lot of time trying to get the shape of the forward stem "just so". Its still not what I want, and I might have to make a new one. Once its right, I'll make a pattern so future builds go faster.
I also need to work on the stern shape. Its really tricky because the shape changes so quickly back here:

Ok that's enough pep talk. 'Till tomorrow...
Day five and six:
I'll combine these two days because not much exciting happened. The work has become tedious and not very "bloggable". First, I made patterns for the stems and fussed over them endlessly. I want it to look "just so", but since I don't know exactly how to get what I want, the best I can do is draw the curve over and over, followed by a spell in the moaning chair, then do it again. I'm quite pleased with the aft stem:

And I'm OK with the forward stem for now. Sometimes one needs to give up and move on. I'll do better on the next one:

I fixed the lines aft:

Things were looking good, and I thought I was home free...until...(cue old radio drama music):

This probably looks OK to you, but I know that its not what I was going for. Remember I'm building a slightly tweaked version of the Rebecca design. My eye was telling me the chines were too far apart. So, I checked my measurements. Again and again I checked them, but they all agreed with the measurements I lifted from the great performing Rebecca. I was stumped. To make a boring and convoluted intellectual journey short, in the end I realized that I had failed to take something specific into account when measuring the original Rebecca.
Its one thing to build a kayak this way by eye, but what's important is being able to copy it! Musicians talk about this, about aural memory, and of course music is written down, like any written language, so ideas can be accurately reproduced without relying on memory. My own language, invented by me to convey the idea of this kayak, was flawed. I realize there is a well established method of doing this used by those in the field of naval architecture, but I also realize I can build a skin on frame kayak in a week, and test it, before their design even leaves the drawing table or computer. During the long process of building and testing close to 20 kayaks, I felt there was no faster way to achieve my goal of a great kayak. I was right. But now I'm no longer prototyping. I just want to reproduce this design, and now I see the great value of a table of offsets, lofting, moldmaking, etc. Unfortunately, that's just too much work. Its worth it if the boat takes a long time to build, or if I sell the design at some point, but not for me, the designer, building one at a time. So I dreamed up a system of ratios to describe my kayak more accurately. I felt like a mad scientist:
 |
| Hey, what's with the stick up my nose? |
I began, then abandoned, several ideas, including a crazy attempt to describe the rate of change of certain hull parameters with a math equation; basically a "unified theory" equation for this boat. HA! It made my head spin. All I was trying to do was find the correct rib lengths, so, using hard data lifted from Rebecca, I made tables and tables of numbers. Then I graphed the depth to beam ratio to the rib to beam difference. (Yeah, I'll read this tomorrow and wonder who wrote it and what he's talking about.)
The end result was a simple graph to guide me when building kayaks of similar shapes, and a table that flat out tells me what the rib lengths should be for Rebecca.
Its not exciting boatbuilding, I know. Sorry about that. If all I was doing was building, I'd be done by now. But, once again, if you know where you are going, then you can make the right choices. These last two days were about discovering where, exactly, I was going.

The boat looks nice. Too bad...I would like to test it, but I can't. I've already moved the cockpit aft 2 inches, and increased the rocker. If I make too many changes, I won't be able to sort out which changes are affecting performance accurately. Besides, I think it will be slower then Rebecca, but maybe a fuzz more stable.
Day Seven:
Today I replaced several ribs, then finished the frame:

Its finally the shape I want it to be, and because I now that have a better system for copying the shape, I'll be able to "bang 'em out" in the future.

Other projects call, so skinning will have to wait a couple of weeks. Bummer! But it was a productive week, and I learned a lot, so I forgive myself for not meeting my goal of a completed boat in seven days. Thanks all for watching and keeping my nose to the grindstone. I'll update this post in a couple of weeks when I skin it.

 |
| The requisite "swoopy boat" shot. |
Day Eight, Nine, Ten, and Eleven:
A month later....
On day eight I skinned and dyed it, day nine (2 hours) I gooped the bottom, day ten (2 hours) I gooped the top, and finally finished it on the morning of day eleven, installing the backband, seat, and deck lines.
 | ||
| Dyed, but not gooped, with a sweet green racing stripe (masking tape). |
I did the stitching in two passes: One to tighten the skin, and another to finish it:

 |
| Here the kayak wears a skirt while the top is being gooped |
Ready to go:

On the water:

Deck line detail. Straps are thick latigo leather. Toggles are oiled black locust. Ironically, black locust has the nicest yellow color:


Home


